How to Fix the Issue of High Memory Usage on Windows 10 Computer?

In this article, you will learn some basic knowledge about Windows computer memory and know the common causes of 100 memory usage, and then you will find out 10 solutions to fix the issue of Windows 10 high memory usage.
Below is Some Knowledge about High Memory Usage
Computer memory is one of the most indispensable physical devices in your computer to store information temporarily or permanently. The computer memory includes RAM (random access memory), ROM (read-only memory), and Cache (you could click computer booting to know the relationship between RAM and ROM). It enables the computer CPU to access instructions and data at a fast speed.
The memory is used to store the operational data of the CPU temporarily and the data is exchanged with external memory (i.e a hard disk). That is to say, the CPU can transfer the data that needs to be operated into the memory for operation, and transmit the result out when the operation is finished.
What’s more, the program installed on the hard drive disk is also loaded into memory for running. Undoubtedly, the main memory is a major factor in determining your computer’s performance and operational stability as well.
Check the Windows 10 High Memory Usage Problem
Windows 10 high memory usage is closely related to virtual memory and RAM. Although computer memory has a close relationship with the CPU and hard drive, the 100 memory usage problem is very different than the problems of high CPU usage and high disk usage.
In many cases, your computer will freeze if it encounters a high memory usage problem. This situation happens often when a large game is running, suddenly, you will see “Your computer is low on memory” error message window.
In fact, you could do a small diagnosis and determine 100 memory usage issues in Windows 10 on Task Manager.
Right-click the taskbar → select Task Manager.
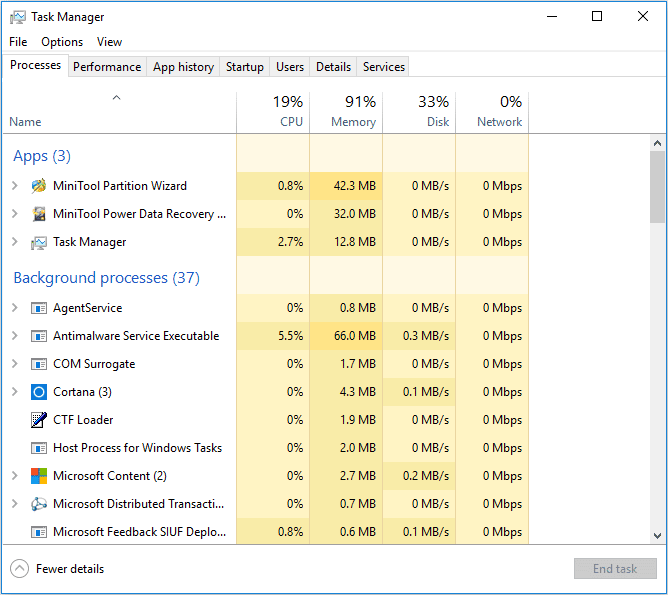
First of all, you should be aware of the common causes of the high CPU/RAM/memory usage problems in Windows 10.
- You are running many different programs at the same time.
- The defective program design.
- The startup programs.
- The registry hack.
- The disk capacity is insufficient.
- Virus or antivirus software.
How to Quickly Fix Windows 10 High Memory Usage?
If you are experiencing Windows 10 running slow or High memory usage problems apply the solutions listed below.
Close some programs you do not need
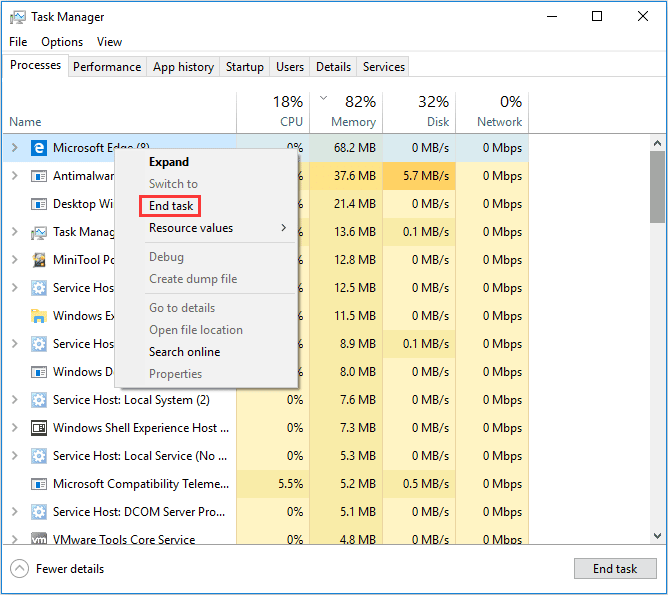
If the 100 memory usage is caused by many programs that are running simultaneously, you need to manually close some unnecessary programs. Or if you notice a program takes up too much memory, end this program to have a try.
Open Task Manager, after that, right-click the application you want to end up under Processes and click End task (see the image below).
Disable the Superfetch Service (Sysmain)
Superfetch (Sysmain) service, designed for traditional HDD, is booted by default. It can improve computer performance by only allowing the memory to load a fraction of the data needed to run common programs quickly.
If your computer disk is hard drive disk, you are not suggested to disable sysmain service, even though it may cause high memory usage on Windows 10. But if your computer disk is SSD, this service should be disabled. Please follow the instructions to disable Superfetch or Sysmain service this way.
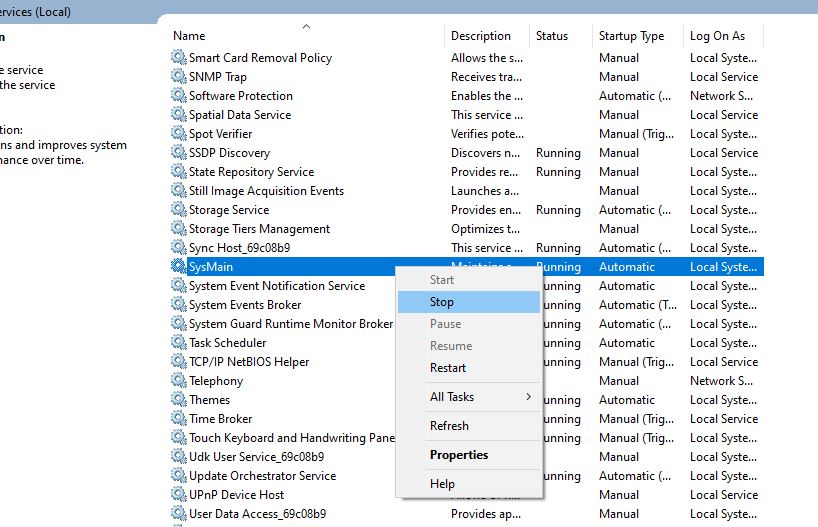
- Press the “Windows + R” keys, and type “services.msc” to open the Services window,
- When it’s done, scroll down to select SysMain, right-click on it, and finally, select Stop to disable the service.
Turn off the Startup Programs
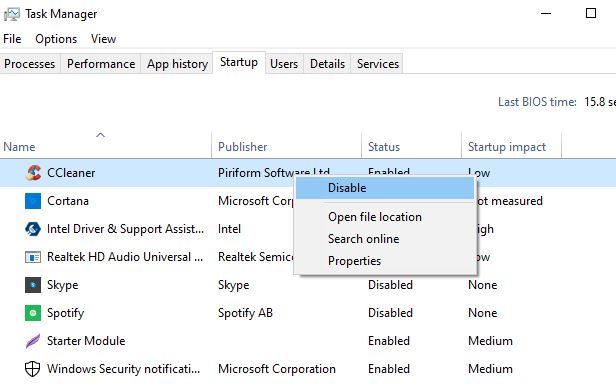
Some programs will run automatically when the computer starts up. If you don’t need these programs to run at startup, you can follow the tutorial to disable them.
Load up your Task Manager, and access the startup programs tab by typing in Task Manager in the Windows search menu. When that’s done, right-click one program or multiple programs that you don’t want to run at startup, at last, select Disable.
Increase the Virtual Memory
Virtual memory can make a portion of disk space work as memory to relieve memory stress. On your computer’s hard disk, the virtual memory is a big file named PageFile.sys. Follow the instructions below to see how to set virtual memory in Windows 10.
Find virtual memory, click Change
- Open File Explorer, right-click This PC and then select Properties.
- Head to select Advanced system settings in the pop-up window.
- When that’s done, click Settings in the Performance box under the Advanced page of System Properties
- Now please navigate to the Advanced page in the pop-up Performance Options window, finally, you can click Change in the Virtual memory box.
Cancel virtual memory on partition C
- First of all, uncheck Automatically manage paging file size for all drives.
- Heard to select partition C and then check No paging file, then click Set to save it.
- You should click Yes in the pop-up warning window now.
Set suitable virtual memory on the non-system partition
- Go and select a non-system partition, and check the Custom size.
- Then you should set the same value in Initial size and Maximum size to avoid the system from frequently requesting page files of different sizes. (That can reduce the consumption of system resources and boost operating efficiency).
- When it is done, click Set and OK to save.
Set the Registry Hack
Please follow the simple instructions.
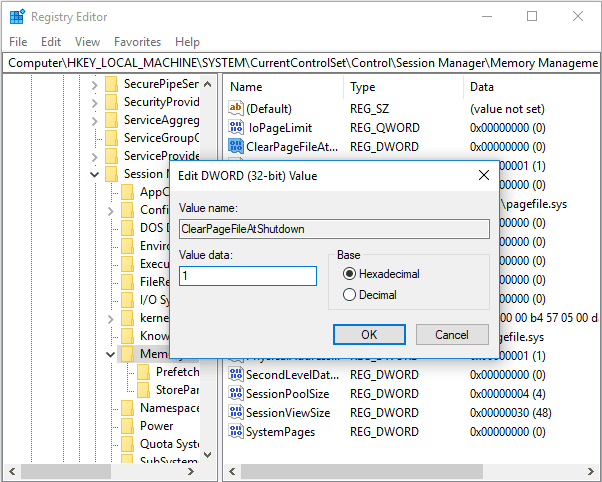
- Go to press “Windows + R” and then type “regedit” to open Registry Editor.
- When it’s done, please navigate to HKEY_LOCAL_MACHINE > SYSTEM > CurrentControlSet > Control > Session Manager > Memory Management.
- Find ClearPageFileAtShutDown, right-click it to modify its value to 1, and after that, click OK.
- Finally, you need to restart your computer to boot up the Registry Hack setting.
Defragment the Hard Drives
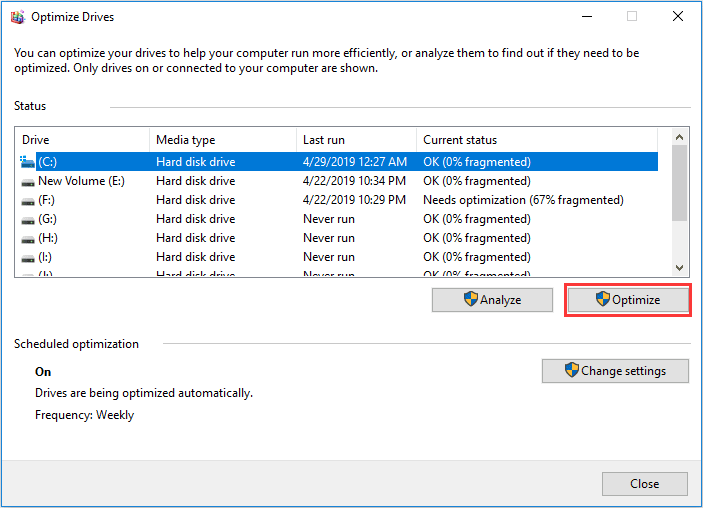
Defragmenting hard drives is a feasible way to save some memory space. Now we’ll show you how to use Disk Defragmenter to do defragmentation.
Open File Explorer, select Partition C, and, please click Manage on the toolbar, and then click Optimize, When it’s done, select Partition C and click Optimize.
Furthermore, Windows users are suggested to delete unnecessary files on Partition C. The Space Analyzer feature of MiniTool Partition Wizard is a good program to do this operation. This feature can also be used to display hidden files for you to delete later.
Try the Methods to Solve Software Problems
Sometimes, Windows 10 high memory usage happens because of memory leak, which is caused by defective software design. The memory leak will influence the computer server where programs will run for a long time. It is going to make memory space smaller and smaller and even result in downtime.
You should know that Windows 10 memory leaks will consume nearly all the memory space. Rebooting the computer can solve this problem temporarily, nevertheless, when the software runs again, the problem will reoccur.
Virus or Antivirus Programs
The virus is another reason to cause Windows 10 100 memory usage. Users can run trustworthy, secure antivirus programs, or they can run the built-in Windows Defender on Windows if they don’t install other antivirus programs. Below is a guide for you to know how to use Windows Defender.
Find Windows Defender.
Click the Start button, select Settings, then select Security & Update.
Run Windows Defender
Click Windows Defender and Open Windows Defender Security Center, when it’s done, select Virus & Threat Protection, and then click Quick Scan.
Here is one tip. Some Windows users have reported that certain antivirus programs, including Windows Defender, may cause Windows 10 high memory usage. In this situation, you could head to end the process of antivirus programs in Task Manager.
Adjust for Best Performance
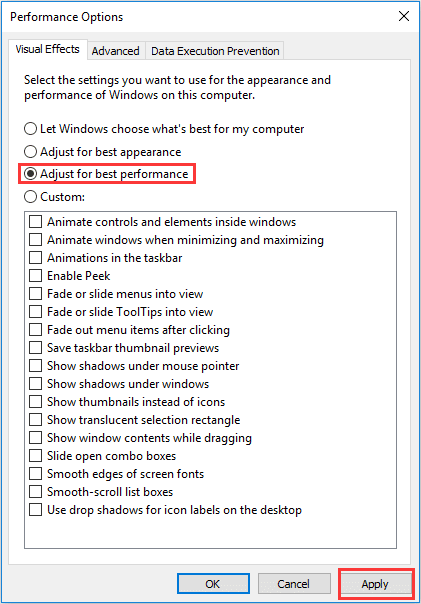
- Open File Explorer, right-click This PC-> choose Properties.
- Click Advanced system settings, after that, please click Settings in the Performance box.
- Now check Adjust for best performance and click Apply, and finally click OK.
Re-install Windows 10
Some users also report that Windows 10 high memory usage only occurs when they stop using the computer for half an hour or nearly one hour. Some other people complain that this problem happens after upgrading to Windows 10. They have tried the above-mentioned methods but still failed to solve the problem. In this case, they need to re-install Windows 10 or reset PC.
