How to boost Gaming performance on Windows 11
You can tweak a number of built-in settings on windows 11 to get the best possible performance for playing Games on your computer

If you are a Gaming user you may know very well how important it is to have your Windows 11 computer running at full capacity. Even Microsoft claims the latest Windows 11 is the best Windows OS yet for PC gaming and It contains the Xbox Game Bar, which is primarily intended to support hardcore gamers. But still few users report while playing games on Windows 11, the gaming performance is not at the same level as on Windows 10. There are a number of ways to optimize or improve Windows 11 performance but what about gaming users? Here in this article, we have a few advanced tips apply to improve gaming performance on Windows 11.
How to Optimize Your Windows 11 PC for Gaming
First of all check and make sure the latest Windows 11 updates are installed on your device. Installing Windows updates not only fix security gaps and improve system performance but also bring driver updates as well.
- Press the Windows key + X and select settings,
- Go to Windows Update and hit the check for updates button,
- Allow the download and install if new updates are pending there, once done reboot your PC to apply them.

The next thing you need to ensure, you have a stable internet connection if you are playing online Games. And disconnect VPN while playing a game if its configured on your device.
Microsoft recommends
According to Microsoft, disabling these two features improves the gaming experience on Windows 11.
Disable Memory Integrity
- Press Windows key + S and search for Windows security, then select the first result,
- Navigate to Device security then Under the “Core isolation” section, click the “Core isolation details” option.
- And here Turn off the “Memory integrity” toggle switch to optimize gaming.

Disable virtualization
- Press the Windows key + X and select settings from the context menu,
- Click on apps then optional features, and Under the “Related settings” section, click the “More Windows features” setting.
- And here Clear the “Virtual Machine Platform” option to disable the feature and optimize gaming performance on windows 11.
- Click the ok button then restart your PC.
 Performing the above two actions Disable Memory Integrity and Disable virtualization most probably boost gaming performance on Windows 11.
Enable Game Mode in Windows 11
Perhaps the easiest and quick effective way to tweak gaming performance on your windows 11 PC is to enable the Game mode. Enable this option stops background activities like windows updates and app notifications to help boost FPS in your Games.
- Press the Windows key + X and select settings from the context menu,
- Click on Gaming then expand the Game mode section and finally toggle on the button next to Game mode.

Update your GPU drivers
The GPU (Graphics Processing Unit) or Graphics driver is crucial for the gaming experience and to your PC performance in games. If you have an older or outdated Graphics driver on your PC that not only slows down the Gaming experience but also may result in bugs, glitches and system crash.
To ensure that newer games are also fully supported, you should always have the latest drivers installed.
Even Windows 11 doesn’t update your GPU drivers automatically, That’s why we recommend take this issue seriously and manually check for updates or reinstall the graphics driver with the latest version.
Depending on your GPU’s manufacturer, you can download either Radeon Software Adrenaline or GeForce Experience to get the graphics drivers automatically.
The safest way to get the latest driver is to go directly to the manufacturer’s website, choose your GPU model, and check for updates.
In addition, if you have an NVIDIA graphics driver, GeForce Experience includes game capture and streaming software and provides special Game Ready drivers, designed by NVIDIA in collaboration with top game-developing companies.
Note – To Check What Graphics Card (GPU) Is in Your PC open Windows 11 settings. Navigate to System followed by display then Advanced Display and click Display adapter properties.

Install DirectX 12
DirectX is another key element of the gaming experience and the game uses it to communicate with your computer and tell it what to do. The latest version of DirectX 12 offers support for multiple GPU and CPU cores, better frame rates, lower power consumption, and enhanced graphical effects.
Installing windows updates usually keep the DirectX version updated, To check and verify you have the latest version of DirectX 12 installed on your computer.
- Press the Windows key + R, type “dxdiag” and click OK, The DirectX Diagnostic Tool will open.

If you don’t have DirectX 12, go ahead and install it; the process will take just a few minutes. Hit Windows key + I, choose windows update and click Check for updates. Wait for the installation to finish and reboot your PC.
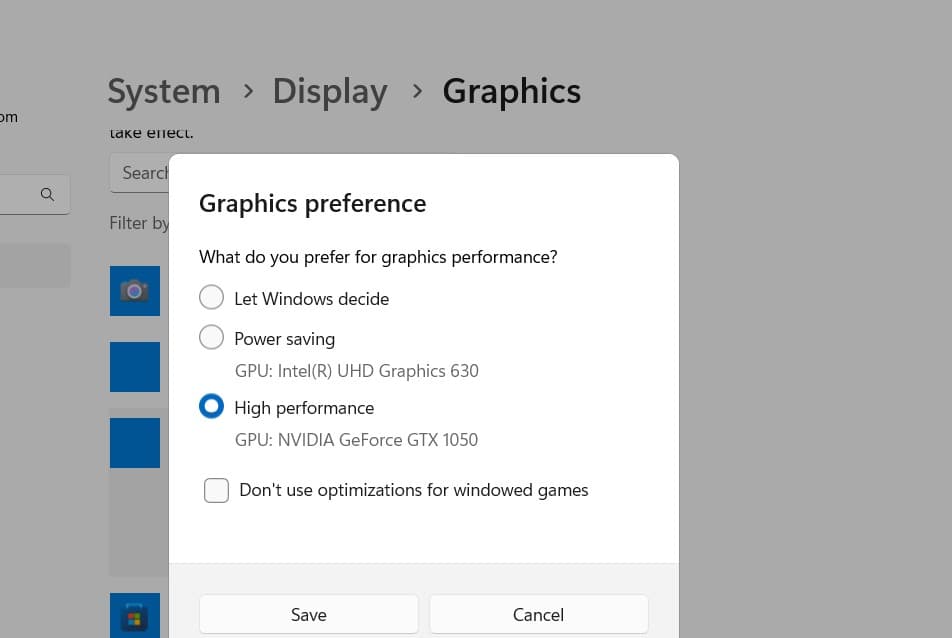
Select the Correct GPU as Default for Gaming
This is applicable for Gaming PC or laptops having multi GPUs – an iGPU (integrated GPU) and a dGPU (dedicated GPU). You decide which apps use which GPU on your PC,
And setting the high-end dedicated graphics card as the default for your games will optimize gaming performance on your Windows 11 PC.
Assigning your dedicated GPU to games is a great way to ensure top graphics performance.
- Open settings using windows key + I
- Navigate Gaming then Game Mode and Under Related Settings, click “Graphics”.
- Here on the Graphics Performance page, you can choose the GPU for your apps and add new apps to the list.
- By default, Windows automatically assigns a GPU to each app. But, you can change it manually.
Note- The Power Saving option should be allotted to the apps that don’t require graphics performance and the High-Performance option for games and GPU-centric apps.
Turn off SysMain and Prefetch
For a few users, Disabling the Sysmain (formerly its SuperFetch) and Prefetch service not only speeds up the windows 11 Pc but also enhances the gaming experience as well.
Disable Sysmain service
- Press the Windows key + R, type services.msc and click ok to open the windows service console,
- scroll down to locate Sysmain service, double click on it to open its properties,
- change startup type disable and stop the service next to service status,
- Click ok and apply to make save changes.
Disable prefetch
Press Windows key + R, type regedit and click ok to Open the registry editor and navigate HKEY_LOCAL_MACHINE \ SYSTEM \ CurrentControlSet \ Control \ Session Manager \ Memory Management \ PrefetchParameters.
Now double-click on EnablePrefetcher in the right pane and change the DWORD (32-bit) Value to “0” (without quotes).
Turning On High-Performance
Another way to optimize Windows 11 for gaming is to change power settings to High-performance mode.
Press Windows key + R, type powercfg.cpl and click ok to open the power options window, here Select “High performance” in this window.

Note: If you don’t see the ‘Show additional plans’ option, click on ‘Create a power plan’ in the left sidebar and then select ‘High Performance’. You can always tweak the options to your requirement.
Gaming optimization for NVIDIA users
If you’re running an NVIDIA graphics card, there are settings specific to the card within the control panel to boost the gaming experience on windows 11.
- Ambient Occlusion: Turn it on a boost the level to 16x.
- Anisotropic Filtering: Switch to Off.
- DSR – Factors & Smoothing: Switch to Off.
- Low Latency Mode: Turn on.
- Power Management Mode: Change to Prefer Maximum Performance.
- Threaded Optimization: Change to Auto.
Another way to upgrade your gaming experience on a windows 11 PC is to upgrade your graphics card. Having faster GPUs can improve your FPS count significantly, resulting in much smoother gameplay.
If you are still using old HDD on your computer, upgrade to an SSD that not only delivers faster Windows 11 boot times and lightning-fast access to programs but also improves your overall gaming performance significantly.
Similarly adding more RAM also significantly optimizes your Windows 11 performance for gaming.